variational-depth-from-focus · 
CUDA implementation of:
Möller, Michael et al. “Variational Depth From Focus Reconstruction.” IEEE Trans. Image Processing 24 (2015): 5369-5378.
Möller, Michael, et al. “Variational Depth from Focus Reconstruction.”. arXiv preprint arXiv:1408.0173v2 (2014).
This paper deals with the problem of reconstructing a depth map from a sequence of differently focused images, also known as depth from focus or shape from focus. We propose to state the depth from focus problem as a variational problem including a smooth but nonconvex data fidelity term, and a convex nonsmooth regularization, which makes the method robust to noise and leads to more realistic depth maps. Additionally, we propose to solve the nonconvex minimization problem with a linearized alternating directions method of multipliers (ADMM), allowing to minimize the energy very efficiently. A numerical comparison to classical methods on simulated as well as on real data is presented.
Dependencies
CMake, CUDA, OpenCV
MacOSX (10.9, 10.10)
See commit 17226b9 for OpenCV 2.4 support.
We installed OpenCV 2.4.10 and CMake 3 using brew
make sure brew is installed correctly
ruby -e "$(curl -fsSL https://raw.githubusercontent.com/Homebrew/install/master/install)"
brew doctor
install cmake and opencv
brew install cmake
brew tap homebrew/science
brew install opencv
Install CUDA 7.0, which comes with C++11 support and is compiled with libc++ which is the default on OSX since 10.9. This really simplifies the installation, because prior to 7.0, CUDA was built with libstdc++, so the OpenCV dependency would have to be built with libstdc++ as well (e.g. by passing the –with-cuda flag).
http://developer.download.nvidia.com/compute/cuda/7_0/Prod/local_installers/cuda_7.0.29_mac.pkg
Linux
Our code was tested under Arch Linux with OpenCV 4.1.0, CMake 3.14.3 and CUDA 10.1.105. It should compile and run successfully under your favorite linux distribution if it provides the above mentioned dependencies.
Please use the appropriate package manager of your distribution to install these packages; below is an example for Arch Linux
pacman -S opencv
pacman -S cmake
pacman -S cuda
Additionally, a PKGBUILD is provided for Arch Linux users.
Windows
See commit 17226b9 for OpenCV 2.4 support.
The code was tested under Windows 8.1, OpenCV 2.4.10, CMake 3.2.1, CUDA 7.0 and assumes you have a working version of Visual Studio installed. In our case, we worked with Visual Studio Ultimate 2013.
If you do not have a version of Visual Studio, it is recommended that you install it first. One can obtain a free version under the following link: https://www.visualstudio.com/en-us/products/visual-studio-express-vs.aspx
Download and install CUDA 7.0, which can be found under:
https://developer.nvidia.com/cuda-downloads
Next, install OpenCV 2.4.10 from
https://sourceforge.net/projects/opencvlibrary/files/opencv-win/2.4.10/opencv-2.4.10.exe/download
Please remember in which path you installed OpenCV, since we have to add to the Windows PATH environment variable
your/path/to/opencv/build/x64/vc12/bin
If necessary, replace x64 with x86 for a 32-bit system and vc12 with vc11 for Visual Studio 12 or vc10 for Visual Studio 10.
Lastly, we need to install CMake, which can be obtained under: http://www.cmake.org/download/
Installation
Now we are ready to build our code
Mac OSX and Linux
Check out our repository, create a separate build-folder and then build the files using CMake.
cd ~/projects
git clone https://github.com/adrelino/variational-depth-from-focus.git
cd variational-depth-from-focus
mkdir build && cd build
cmake ..
make
Windows
Check out the repository under some directory, e.g.
C:\variational-depth-from-focus
Start up CMake and specify where the source code is found. In our example this would be
C:\variational-depth-from-focus
Next, you have to specify, and if necessary create, a folder into which the binaries get generated.
We choose to create and use
C:\variational-depth-from-focus\build
Now we need to set the compiler under Tools → Configure. Choose your compiler and select “Use default native compilers”. Click “Finish” and CMake will try to generate the build files. If you get an error message about “OpenCV_DIR-NOTFOUND”, click on this message and specify the path to
your/path/to/opencv/build
Everything should now work smoothly and then you can open the generated “variational_depth_from_focus.sln” in Visual Studio, which can be found in the build folder. In Visual Studio, unload all projects except “vdff” (by right-clicking them and choosing “Unload Project”). Right-click “vdff” and select “Set as Startup Project”.
Next, we have to define the”NOMINMAX” preprocessor directive. Right-click again “vdff” and click “Properties”. Select on the left “Configuration Properties” → “C/C++” → “Preprocessor”. On the right, click into “Preprocessor Definitions” and insert
;NOMINMAX
Click OK. Then select “BUILD” → “Build solution”.
The project should now compile successful. If the compiler complains that it can not find “dirent.h”, you have to download the windows implementation of the header file from here
http://www.softagalleria.net/dirent.php
and copy it into the include folder of your Visual Studio installation.
For Visual Studio 2013 the path would be
C:\Program Files (x86)\Microsoft Visual Studio 12.0\VC\include
Execution
Quickstart
If you just run
./vdff
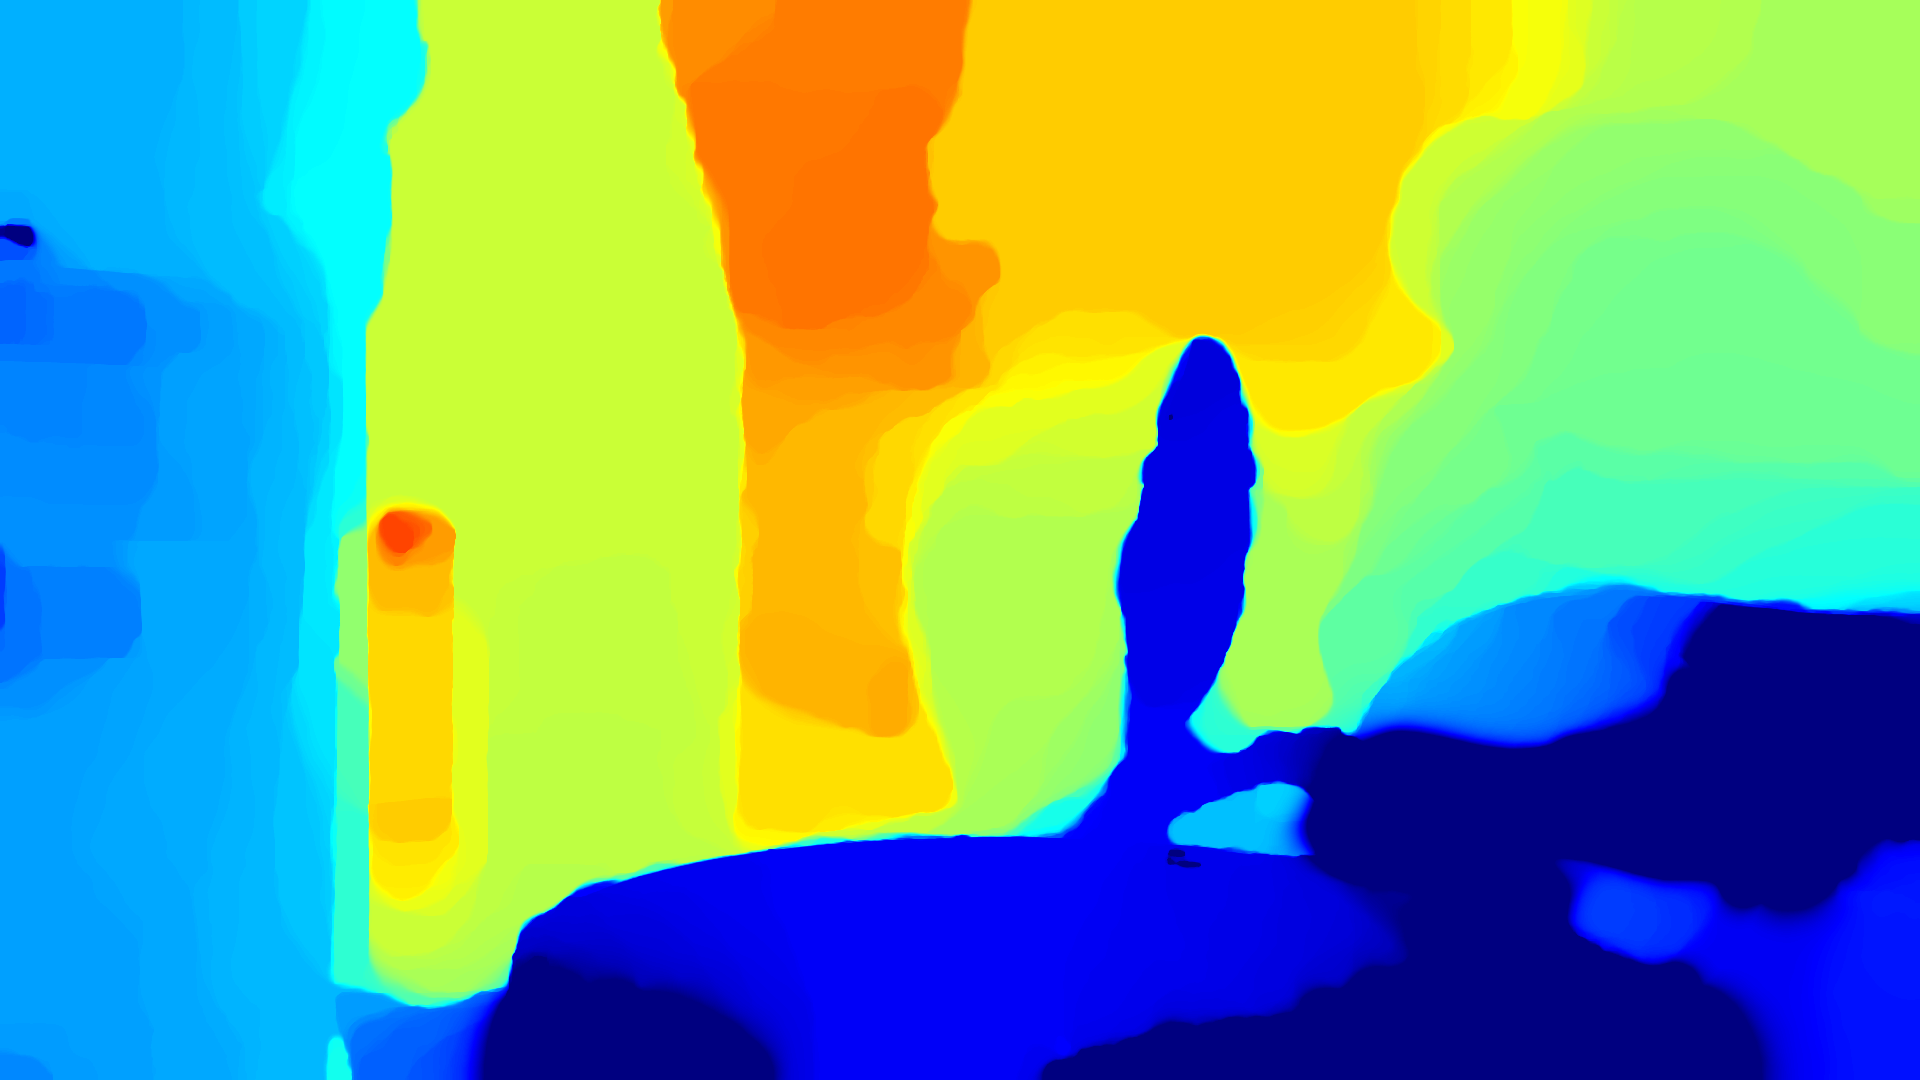
then our code uses the included focus sequence with appropriate default parameters.
The focus sequence was generated from a textured image using the Defocus simulation code from http://www.sayonics.com/downloads.html

The expected result looks as follows:

Advanced
You can evaluate your own image sequence by specifying its locaton to the executable via the “-dir” switch, e.g.
./vdff -dir your/path/to/imgs
All pictures of your sequence have to reside in the specified folder; pictures located in sub-folders are ignored. Currently supported file formats are JPEG, TIFF and PNG. Additional parameters can be used, which are explained in more detail below.
Parameters
The following parameters have to be preceded by a single dash and their arguments are given after a separating space. For the boolean parameters we use 0 as false and 1 as true.
| Parameter | Expected Type | Default Value | Explanation |
|---|---|---|---|
| dir | string | ../samples/sim | specifies the location of your image sequence. All pictures have to be in the folder; no sub-folders are supported. |
| smoothGPU | bool | 1 | if enabled, the GPU is used to smooth the initial obtained MLAP estimates. (increases speed) |
| pageLocked | bool | 0 | if enabled, pageLocked-memory and cuda streams are used to speed up the creation of sharpness images |
| minVal | int | -10 | minimum value of the range for which the polynomial approximations are calculated |
| maxVal | int | 10 | maximum value of the range for which the polynomial approximations are calculated |
| polyDegree | int | 6 | specifies the degree of the polynomials we fit to the sharpness values |
| denomRegu | float | 0.3 | regularizer used to decrease importance of sharp edges |
| nrIterations | int | 400 | nr. of iterations of the ADMM algorithm |
| convIterations | int | 0 | specifies at which number of iterations the proposed convergence scheme is used (see section 4 in the above paper). The default is to use it from the beginning. |
| lambda | float | 1.0 | corresponds to the λ used in the ADMM algorithm |
| grayscale | bool | 0 | convert image to grayscale before further processing |
| export | string | ”” | if a string is supplied, the created depth map is exported to the desired absolute or relative file-path after the closing of the application. Exporting is currently only possible to .png or .jpg; if no suffix is supplied, the png format is assumed. |
Datasets
All the datasets are provided as zip files, unzip them and then run with the -dir option.
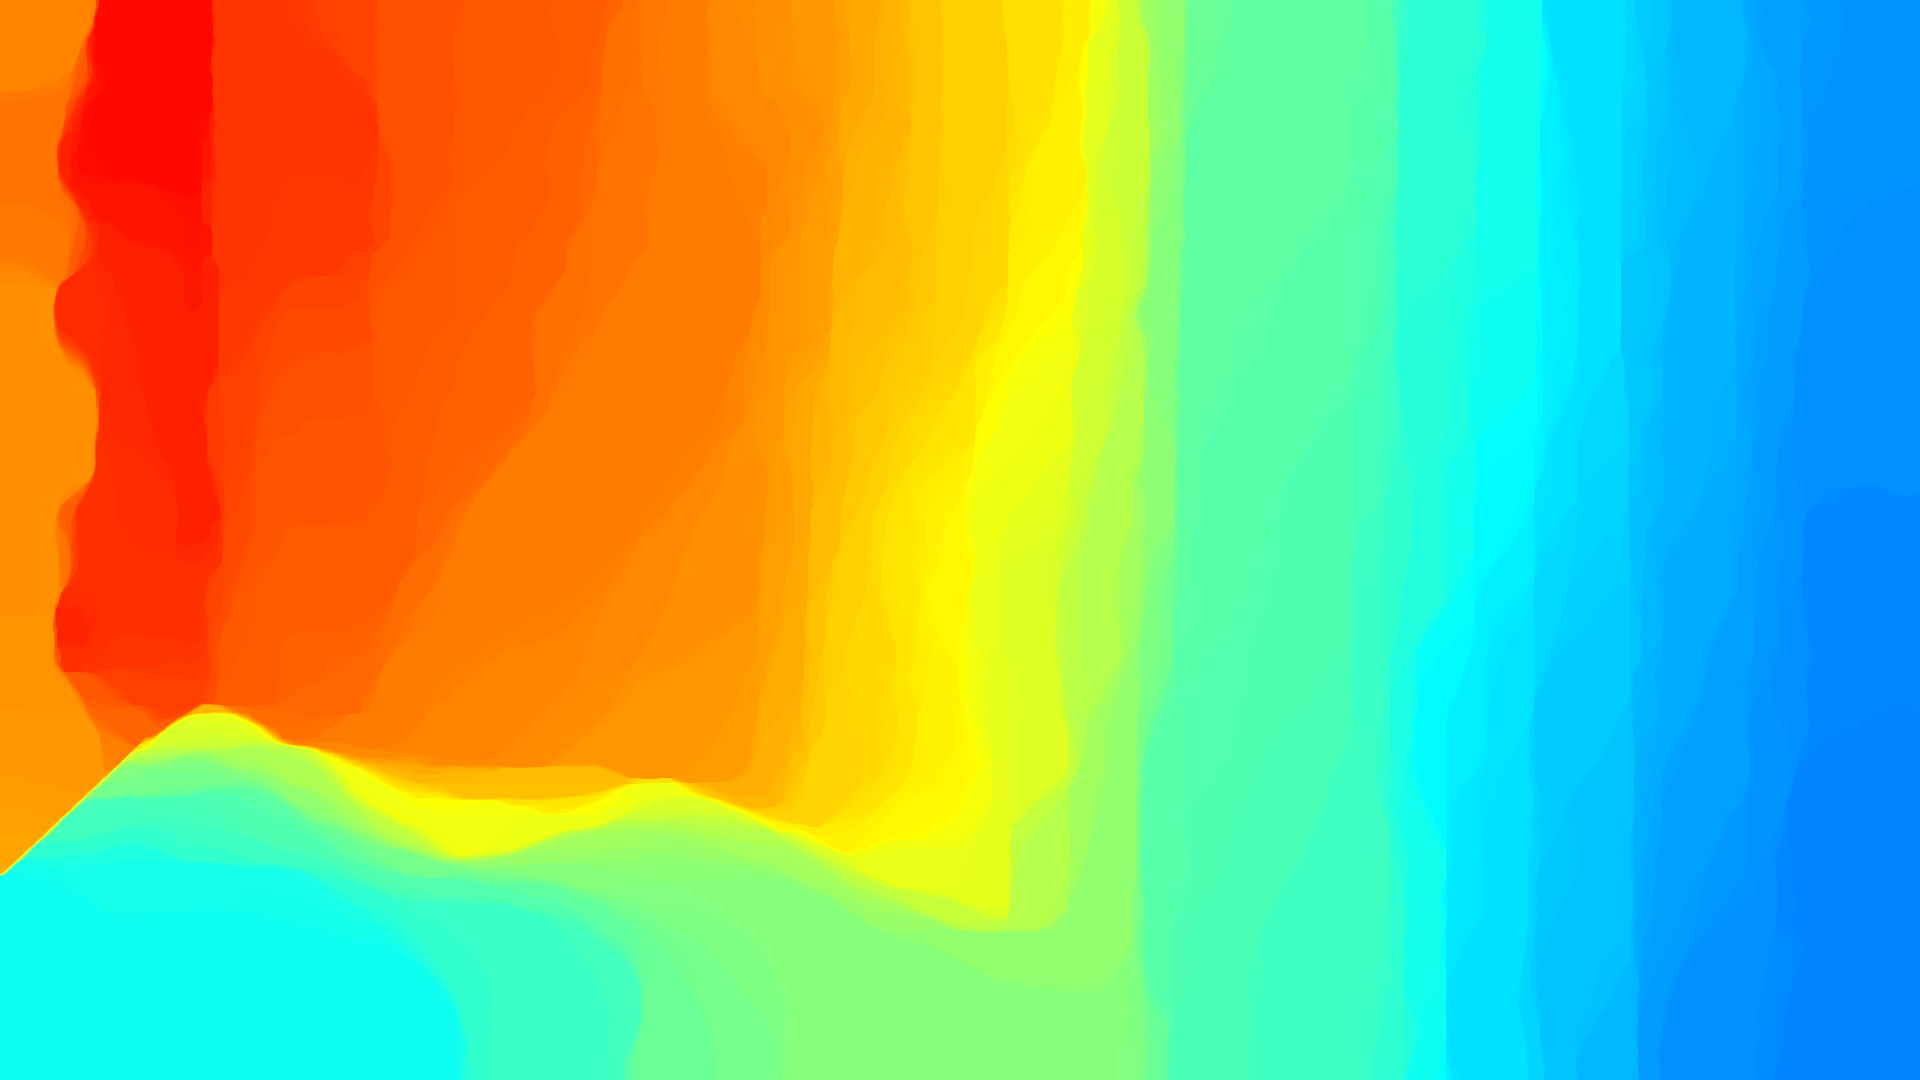
ARRI® - Dataset

The full dataset of the paper is available under the following link:
- http://in.tum.de/~haarbach/fokusfahrt_png_compr9.zip
It consists of 374 16-bit png files which have a total size of 3.86 GB. The result obtained with default parameters should look like:

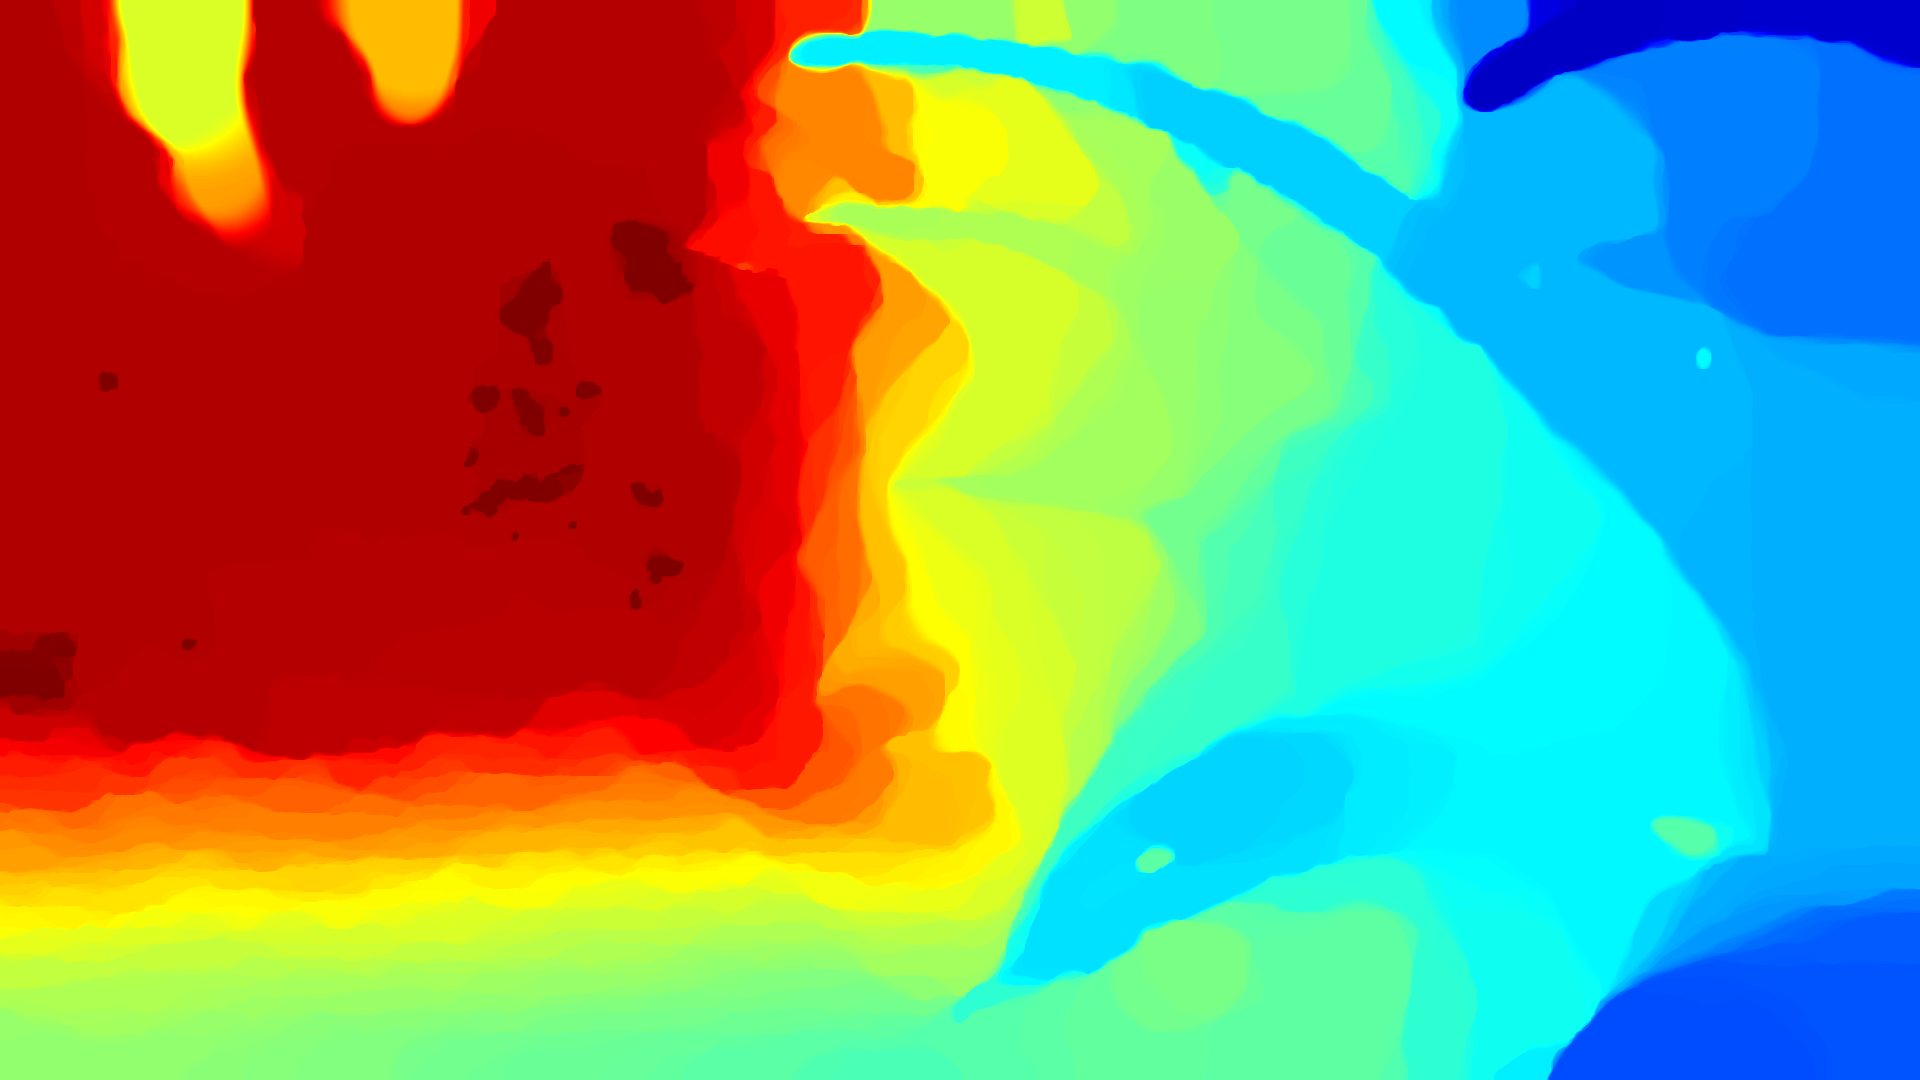
Since this is quite large, we also offer a smaller set, which uses 8-bit jpg files with a compression setting of 95. With a total size of 198 MB it is considerably smaller and offers nearly the same results as the original dataset.
The small dataset can be found under:
- http://in.tum.de/~haarbach/fokusfahrt_jpg_compr95.zip
Due to the compression and loss of precision, you have to adjust the setting of the -denomRegu parameter a little; e.g. a setting of 1.0 is nearly identical to the results of the full dataset:

Booksequence
The same author that provides the focus simulation code we used above also provides a real sequence with different noise levels on his website:
- http://www.sayonics.com/sources/books_00.zip low noise
- http://www.sayonics.com/sources/books_02.zip middle noise
- http://www.sayonics.com/sources/books_05.zip high noise
devCam sequences 
We recently recorded a new sequences using a Nexus 5 device and the devCam Android app, which allows to record a burst of images while varying the focal distance. The datasets can be found under:
-
https://zenodo.org/record/438196/files/balcony.zip (19 images, 8.7MB)

-
https://zenodo.org/record/438196/files/shelf.zip (20 images, <9MB)

-
https://zenodo.org/record/438196/files/alley.zip (20 images, <9MB)

We plan to record further datasets in the future.
Record your own dataset
If you own a Nexus 5 or 6 device you may record your own sequences. For this you may download our fork of devCam, open it in Android Studio and run it on your device using the debug bridge.
The parameters of the image sequence to record, called a burst, are specified in a configuration file in json format. This configuration file varies the focal distance from 8cm to 100cm in steps of 2cm and needs to be copied from the computer to the following folder on the SD card of the Android device:
Pictures/devCam/Designs/
After the capture, a burst of images is saved in the folder
Pictures/devCam/Captured/<capture design id>
For copying the json file to the device and copying the captured image folder back to the PC one can use the MTP based Android File Transfer on Mac. Note that if new folders/files don’t show up, just restart the Android File Transfer program and if that doesn’t help, restart the phone.
Since varying the focal distance also changes the field of view, corresponding pixels will no longer be aligned. This effect can be removed by aligning all the images and optimizing the field of view for all images using the align image stack of hugin. This outputs tiff images, to save space one can convert them back to jpg using the compress application provided in our repository.
cd <vddf repo root>/Captured
mkdir ../aligned
mkdir ../aligned/<capture design id>
cd <capture design id>
/Applications/hugin/HuginTools/align_image_stack -m -a ../../aligned/<capture design id>/<capture design id>- `ls *.jpg | sort -n -t - -k 2 -v`
cd ..
../build/compress -compr 95 -indir ../aligned/<capture design id> -outdir ../samples/<capture design id> -type jpg -color 1 -anydepth 1 -debug 0
Note that when using the sweep_focus.json file, which ships with the app, instead of the one we provide above, the order of focal distances is reversed, meaning that the first captured image has the largest focal distance. In this case, just pass -r to sort so that the images will be cropped correctly and the resulting depth colormap is in the same order as in the other sequences.
For convenience, we provide the bash script align.sh which bundles all of the above tasks, and additionally calls the main vdff programm together with the export option to quickly check if a recorded burst gives a satisfying depth map.
Once you have copied the Captured folder to the root of this github repository, then you simply need to run:
cd <vddf repo root>/Captured
../align.sh <capture design id> <reverse>?
This aligns the images, optionally reversing them if a second argument is supplied, crops them, compresses them and stores them in the /samples/